Parts to modify existing Milgard patio door latch

A quick learner says:
I purchased key lock 82-310 and have drilled a hole to insert the new 82-310 key lock in the outside handle. The opening in the existing latch mechanism for the existing latch lever tailpiece is a slot. A square opening, rather than a slot, is required to accommodate a 82-240 type latch lever tailpiece that can interface with 82-310 tail piece. What additional parts are required to complete the modification of the latch mechanism for installation of the 82-310 key lock?

82-240 latch lever tailpiece design with its slotted tailpiece provides a place to insert the keyed lock flat tail piece. However, its end does not fit in the slotted mortise receptacle. A shorter version of 82-240 latch tailpiece that has a length that does not hit the
mortise would work.

82-030A would create the same predicament, i.e. two flat end tail pieces do not connect and slot in mortise does not have sufficient thickness or depth to accommodate partial insertion of two flat tailpieces.

82-106 latch lever is currently installed.

Do you have another option? If no, my possible solution is to purchase 82-240, reduce its tailpiece penetration length, and make a cut to move the end of the slot closer to lever end.
Thumbnail of the uploaded file named Ouside view of enlarged hole for 82-310 key lock with existing tailpiece slot shown.jpg
Thumbnail of the uploaded file named Inside view of existing latch mechanism tailpiece slot.jpg
Thumbnail of the uploaded file named Outside handle with enlarged new hole.jpg
Thumbnail of the uploaded file named Existing latch with inside handle .jpg
Thumbnail of the uploaded file named Existing latch mounting plate with dimensions.jpg
Profile picture of Casey
Casey from SWISCO responded:

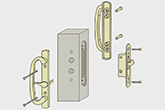
Hello,

It sounds like you may need something like the 82-030 handle set, which has 3-15/16" hole spacing and a slotted tail for the thumb latch as you described. We also offer the centered 82-030A and offset 82-030B versions of this handle set. You mentioned that the 82-030A would create a similar issue but this would be our best match based on your photos and description as long as your thumb latch is centered on the handle.

Dimensions for 82-030A

If you haven't cut the key lock spindle down to size to engage in the center of the mortise with the thumb latch tail, that could be why you're having trouble. See the video below that shows the process of cutting the keylock spindle down to size at the end. Just make sure not to cut it too short or it will not engage with the mortise lock. Thank you. 

A quick learner says:
My response: 82-030A and 82-030B are the same handle configuration that I have with my existing type mortise lock that is shown in the pictures that I previously provided. My mortise lock mechanism has two pins that "latch" to the adjacent door when it is locked with a different method than your referenced mortise locks. In addition, the axial depth or thickness of the slot in my mortise that receives and provides adequate contact for my original thumb lever flat tail end, is not deep enough to provide the minimum contact length for two flat tail ends, i.e. thumb lever flat tail end and keyed lock flat tail end, and actuate the mortise mechanism. I require a different design mortise lock assembly that will fit into my existing mounting holes as shown in the picture that I previously provided and will accommodate 2 tail ends in an end-to-end position, or a version of 82-240 that has an appropriate size slotted tail piece that will fit in the depth space that I have available in my door and receive the keyed lock flat tail end piece. My ordeal with installation of a keyed lock began when Milgard directed me to your company, and your initial representative advised that I had two steps to complete for installation of a keyed lock - drill the 1/2 " diameter hole in the exterior door handle, which I did, and reduce the length of the keyed lock tailpiece, which I did not complete. The flat tail end piece of the keyed lock will not have adequate contact length within my existing mortise lock slot with the end of the thumb lever flat tailpiece. Presently, I have an exterior handle with a hole and Swisco parts that do not provide a solution. I need a solution for the patio door handle sets that Milgard incorporated a couple of years ago.
Profile picture of Casey
Casey from SWISCO responded:

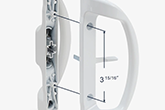
Thanks for getting back to us. Unfortunately, we do not carry a suitable replacement for the mortise lock shown in your photos, which uses bolts to lock the door compared to our parts that lock using hooks that extend from the mortise. You're welcome to look through our selection here

Also, please note that the 82-240 is not designed to work with your mortise lock, which would require a square opening instead of a slot. The 82-030 style handle sets use a thumb latch with a flat tail that should be compatible with your mortise lock, which we have come across in the past. 

You also mentioned that you did not cut down the length of the tailpiece of the 82-310 key lock that you purchased, which would be required for installation. The 82-310 comes with an exceptionally long 2-1/4" tailpiece so that it can be modified to fit doors of various thicknesses, which would explain why you are unable to install the thumb latch and mortise lock in the mortise opening. 

You would need to follow the process shown in the video from our last response to break off a small amount of the tail at a time until the thumb latch and keylock engage properly in the mortise opening. Just make sure to break off small portions of the key tail at a time and test it in the door until you reach the correct length. If you cut off too much, the lock will not engage with the keeper and you will not be able to use the key lock. 

Alternate view of 82-310

How to Install a Key Lock on a Patio Door
VIDEO
WATCH >
Legacy Patio Door Handles, Locks & Spindles
GUIDE
READ >
How to maintain a sliding glass door
GUIDE
READ >
How to install the 82-030 Handle Set
GUIDE
READ >
Reply to Thread
Use this form to ask a follow-up question or to share your experience regarding this subject.
(your email address will be kept private and is only used to inform you when a response has been made)
Current wait time is 3-4 business days
We promise that one of our experts will personally get back to you as soon as they are able. Thank you very much for your patience and understanding. If your inquiry is time-sensitive, please feel free to reach us at (888) 991-1929 or at help@swisco.com.