This step-by-step tutorial shows how to replace glazing bead and insulated glass in an aluminum window sash.

Whether your glazing bead becomes brittle and dry from prolonged exposure to sun and inclement weather, or you’re in a situation that requires new glass, this step-by-step tutorial will demonstrate how to replace snap-in glazing bead and insulated glass in an aluminum window sash.
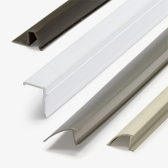
Necessary Tools:
WARNING: be sure to wear safety glasses and use caution while working with glass

STEP 1
Once the sash is removed, place it on a flat surface and use a slotted screwdriver and stiff chisel
putty knife to loosen the lower leg of the beading out of the groove in the sash. Repeat on each
side until the old snap-in is completely removed.

STEP 2
Once your snap-in is removed, compare the style and dimensions of the original piece to determine
the correct replacement for your sash.


STEP 3
Turn the sash over and loosen the sealant with help from a heat gun. As you use the heat gun, run a
utility knife along the edge of the sash. Once the sealant is fully removed, the glass should be
free to drop out of the sash.


STEP 4
If you are replacing the glass, measure the height, width, and thickness. Pass along any
manufacturer information and the dimensions of your glass to your repair shop for a better idea of
your replacement lead time.

STEP 5
Set the glass aside to begin working on the frame. If your window has setting blocks, mark the
general location of them in the lower section of the frame. Sometimes called shims or spacers,
setting blocks serve as a cushion between the glass and the frame. While they don’t need to go in
the exact location, be sure to return them to the same portion of the sash frame when resetting your
glass.

STEP 6
Now, use a chisel and heat gun to scrape excess sealant from the area.

STEP 7
Use a caulk gun to run a bead of sealant along the inner edge of the frame. We prefer to use a
translucent latex-based caulk, as it’s easy to clean up mistakes. Just use a bit of soap and warm
water to get rid of any excess caulk. Place the setting blocks back in the frame with a little
caulk.


STEP 8
Now, carefully place the original or new glass unit back into the sash frame.

STEP 9
To install the new snap-in glazing strips, first measure and mark the needed lengths. Use Wiss snips
to cut and shape the new beading. For the longer sides of the window, cut the snap-in to the needed
length, then angle the shorter sides to meet them.


STEP 10
Set the top edge of the beading into the groove in the sash. Then, place the lower leg onto the
glass, making sure it snaps into place against the glass.

Since replacement glass can take weeks to fulfill, you may want to keep the glass in the frame until the new unit is ready. To avoid bringing the entire frame to a glass repair shop or hardware store, measure the length and width with a measuring tape, then use Glass Calipers to measure the thickness. Since glass calipers can give an accurate read while the glass is still installed, it will save you the trouble of removing the original glass before you’re ready to replace it with the new glass.
Use the calipers by sliding the jaw around the sash frame. For an accurate measurement, slide the adjustable jaw until the adjusting screw touches the glass.

If you’re working on several windows, speed up the repair up by using the E.Z.D Glazer in place of a utility knife in step 3. Run the de-glazer along the edges of the frame to loosen the old caulk that’s holding the glass in the frame. With proper care, this tool can withstand multiple years of use. Just replace the cutting wheel periodically.

For contractors or anyone else working on a larger scale version of this repair, consider adding a Vacuum-Powered Grip to your needed tools list for step 8. The 8” suction cup can lift up to 125 lbs., making it much more time-effective to reinstall the glass over the course of many windows.

To see our experts complete this repair, watch our video below. For the parts featured in this tutorial, or additional guidance, visit us at SWISCO.com.