SWISCO’s resident balance expert has developed a few tricks over the years and is ready to clear things up for customers in the midst of a channel balance repair.

Hello there! My name is Tom and I’m here to help you determine what fittings will be best for your non-tilt window channel balance.
Identifying this kind of balance is usually a straightforward and simple procedure. For a more comprehensive analysis, take a look at our guide for choosing a non-tilt channel balance. Essentially, you pick out the top and bottom fittings, figure out your length, and finally, you match up the stamp printed on the channel. That’s all it takes to get your droopy or stiff windows working as if they were brand new, but each step can come with a few caveats that may seem confusing at first. I’ve been identifying this type of balance for over a decade and the step that confuses our customers the most is how to pick out the correct top and bottom fittings.
It seems fairly easy on paper: simply match up the style and size of the top and bottom fittings. But once you start looking at all the different combinations we offer, you notice that they all pretty much look the same. If you aren’t used to handling this kind of hardware it can be pretty overwhelming. Fortunately, I’ve developed a few tricks over the years and I’m here to help clear things up once and for all.
We’ll start with the easy one first. The top fitting of a channel balance for non-tilt windows serves a very easy function. It exists to catch the take-out clip when removing the balance, to rest in the top sash guide when operational, and to act as a glide as you slide the window open and close.
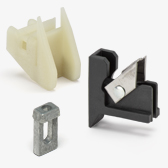
Different manufacturers can use different top fittings. Two main details to look out for are whether or not it has tabs on the side and if the top is flat or pointed.

The tabs help stabilize the balance in the track and the shape of the top determines how it rests in the top sash guide and how it interacts with the take-out clip. There are exceptions to these rules, of course; I’ve seen some top attachments shaped like boats, and others that are long plastic hooks. If your top attachment really doesn’t look like anything we carry, you can always show our experts a photo via the SWISCO.com discussion board, and we’ll do our best to track it down.
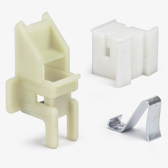
The bottom fitting is usually where people get confused the most. Like the top fitting, the bottom fitting helps stabilize the balance in the track while the sash slides up and down. However, it also braces the sash against the jamb track to ensure that it doesn’t wobble during operation. Because of this, the size of the bottom fitting is an essential part of identifying a good match.

What’s more is that multiple products in our catalog use the same top fitting, but all use different bottom fittings that look identical with just very slight differences. It’s a lot to take in, but I’m here to set the record straight.
Before I further explain the protocol for identifying these parts, you should know that there is a special type of bottom fitting that you need to keep an eye out for. It looks very similar to our other products but with one major difference: it has a pulley wheel built inside the fitting itself. If this description matches what you have, then none of our stock balances will work for you. It will have to be a custom order.

But don’t worry, we can definitely help. All you need to do is show photos of your balance to our experts so that they can help you through the custom ordering process.
Our experts will often ask you to measure the depth of the bottom fitting in order to determine the best replacement product. This measurement isn’t always obvious, though, and a lot of people define “depth” in different ways. It helps when you understand that the function of a bottom fitting is to brace the sash against the jamb track.
Here’s an easy way to visualize it. First, remove the balance from the window so that you can get as accurate a measurement as possible. Then, stand it straight up on a table, just like it would look while installed. Make sure the top fitting is pointing straight up in the air and the bottom fitting is sitting on the table. Now imagine that the bottom fitting is a shoe, or foot. It even sort of looks like it, doesn’t it? The “depth” will be the measurement from heel-to-toe.

After that, you simply match up your depth measurement to the options available for each of our Series. We have detailed measurements for our balance products that you can use as a reference.
Like I said, this is an essential part of identifying the proper balance for your window. You don’t want the shoe to be too shallow or too deep. If it’s too shallow, then your sash will wobble from side to side when you open and close it because it’s not braced properly. If it’s too deep, the bottom fitting will dig into the vinyl sash or jamb track and could irreparably damage the frame. In a lot of cases, the balance won’t even install to begin with because there’s not enough room.
Those are some serious problems that you obviously don’t want to deal with. I always recommend that you measure, then measure again, then measure a third time just to be sure.
Odds are, the balances in your window are pretty old. You’ve been opening and closing your windows for over a decade before the hardware finally failed. All that friction may have worn the depth of your shoe down a hair or two from its original size. Because of this, your measurement may fall short of any of the balances on our site. This is something to keep in mind when taking your measurements.
That about covers it. Like I mentioned above, there’s always going to be an exception to every rule. I’ve worked in this industry long enough to know that nothing is written in stone. Do your best to identify your balance fittings according to this guide, but if you have any doubts whatsoever, or if you believe you have something different and unique, then you can always contact us directly. We look at these balances every day, and we’re well equipped to tackle any issue you may be confronting while trying to repair your windows.
For anyone who needs it, the SWISCO.com team of experts demonstrate the installation process for a standard channel balance once we’ve identified the correct replacement option for your window.