Some parts are hard to come by but SWISCO’s team of experts have some workarounds that can make projects like replacing Simonton balances much easier.


Simonton is a common window brand that our company comes across when assisting customers with their repairs, especially regarding the coil balance pivot shoe, which is not readily available. Certainteed carries a pivot shoe similar to the one used by Simonton but the dimensions differ, making it difficult to install.
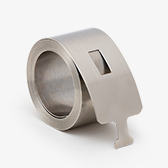
There was no better solution to repair this coil assembly until our team of experts confirmed that the 15-259 pivot shoe is a good fit for the Simonton window.
You’ll need other parts on hand to successfully convert your windows to this new system, such as the Series 159 coil springs, as well as either the 15-255 single or 15-256 double coil support depending on the number of springs used on each side of the window.

One thing to consider during this process is that the original Simonton pivot bar (left) is too large to engage with the cam of the new pivot shoe, so they’ll need to be replaced with the 26-083 pivot bar (right). No modifications to the sash should be necessary to install the new pivot bars.
The strength codes offered for the Series 159 coils differ from the original Simonton coils, so it’s important to weigh the window sash before purchasing replacement parts.

Dividing the sash weight by the number of coils in the window will help you choose the best strength options to support the window.
Keep in mind that you won’t get an even number that exactly matches the available options for the Series 159 since, unlike the original coils, the strength options are in .5 pound increments. It’s important to choose the combination of coils that is as close as possible to the sash weight, ideally within 1 pound.
The original cutout may be on the small side, so we recommend carefully enlarging it using a utility knife or file to make the process of removing the coil balance and installing the new assembly easier.
If there is no pre-existing cutout, you can make one near the top of the track for the bottom sash and at the bottom of the track for the top sash balances. Be sure to make the cutout big enough to install the shoe without compromising the integrity of the channel.
Once the cutout is ready, slide the Simonton shoe up to the cutout by rotating the metal cam with a slotted screwdriver. Then, remove the screw holding the coil cover and bushing in place. Keep in mind that removing the parts from the channel may require some manipulation.
Next, attach the coils to the pivot shoe before inserting the assembly shoe-first into the cutout. Then, screw the cover and spring to the track before lowering the pivot shoe into place a few inches above the window sill.
Once this process is completed on both sides of the window, you can reinstall the sash and test the window to make sure it operates smoothly.
Follow along with the video below that will walk you through the replacement process from start to finish.
If you have any problems along the way, feel free to post photos and questions to the online discussion board.