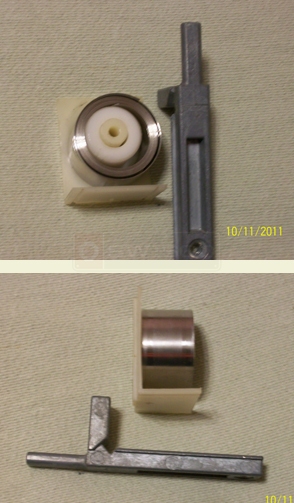
November 9, 2011
We have CertainTeed windows that were installed in 1992. On two of the windows the balance spring has broken, most of the spring is still attached to to the spindle and a portion of the spring is at the bottom of the window attached, presumably, to the pivot bar. If you remove the window from the casing will that part of the spring come out with it? Also, everyone says there should be a number stamped on the spring. Where can that number be found?
Thank you for your help as I am getting desperate to find this part.

|
November 14, 2011
When you remove the sash, you should then be able to remove the spring and pivot shoe. I believe CertainTeed has a cut out in the track for this. As for the stamp, you should find it printed on one end of the spring.
|
November 14, 2011
I found the number stamped on the spring - it is 407. But that leads to another problem, the window will not come out of the casing because it (I guess) has a part of the spring still attached. When you respond, would you please advise how to get the window out of the casing. Thank you.

|
November 15, 2011
I believe now that your balance coil is our S170-407. To remove your sash, please refer to this tutorial on how to Install Channel Balances, the beginning of which details how to remove your window sash. |
November 15, 2011
The tutorial was interesting but our windows have the coil spring balance. The spring broke and part of the coil is still attached to the window and I can't remove that part of the coil balance. So what I need to know is how do you remove the pivot bar from the window when part of the coil spring is still attached to it and I cannot get the window out of the frame.

|
November 16, 2011
The tilt bar does not attach to the spring. Rather, it fits into the round cam in the pivot shoe. Since the spring is attached to the pivot and the other end is attached to the round bushing screw in the frame, you will want to remove the pivot shoe.
|
November 21, 2011
I'm making some progress, I have learned how to remove the broken spring from pivot shoe by removing the screw that held it in the pivot shoe. But now how do you replace the spring? One end attaches to the pivot shoe and the rest of the spring is on a reel above or below it. There's probably a simply answer but I'm not seeing it. Also, if you have a tutorial about replacing a coil spring, I would love to see it. Thanks.
December 5, 2011
Thanks for all your help. I received the springs and was able to put them in one of the windows but now I'm having trouble putting the window back in. Any helpful hints on how to reinsert it.

|
December 6, 2011
Make sure the pivot shoe cams are in the up position so you can lay in the sash with the pivot bars into place, then swing up the sash in to the track.
|
December 6, 2011
Is the window inserted in the pivot shoe from the side or does it drop in from the top. If it drops in from the top, then should the window be in a horizonal position otherwise you're trying to insert a square peg into a round hole, so to speak.

|
December 9, 2011
Due to the interest in this particular subject, we are currently filming a tutorial video on how to install a coil balance. We hope to have it up sometime next week. We will post an update in this discussion when the video has been completed. Thank you for your patience!
|

|
December 13, 2011
Please refer to our new video tutorial guide on how to replace a coil balance:
|


