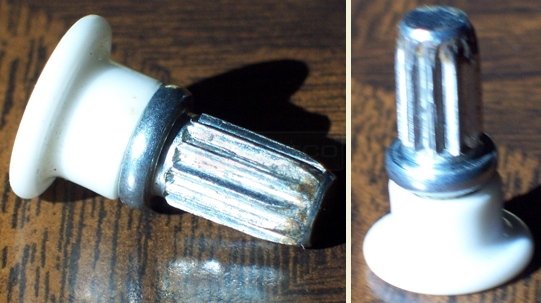
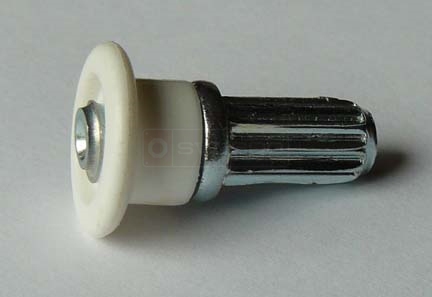
Hi Jon, thanks for posting with images. I have not seen this type of drawer rollers before. I am going to start researching a replacement for you but I would like some more information. Take a look closely at the drawer roller and the other drawer sliding hardware. Look for any stamps, names or patent numbers on any of the hardware. Respond back here with anything you find. Also, do you happen to know who manufactured your kitchen drawers (sometimes you will find a brand name printed on the underside of the drawer)?
Wonderful pictures John, I wish I had some in that good of shape. Mike, the ones referenced in the earlier discussion have too wide a diameter. I measured about 3/4" on the drawer slide.
Has anyone found a replacement for these
rollers ?
Didn't find replacement. Hubby did modify the system by cutting off the slide on the drawer, replacing with a new one from hardware store (riveted onto the drawer over the cut-off remains). Cut off the roller from the other piece and attached it to the cabinet. Thank goodness for the top center guide. Not a perfect solution, but it works great - nice and smooth.
I too am looking for the same roller shown above.. and have been waiting for an answer to kingsport TN's question.
I too am searching for these exact same rollers for my parents. Their home was built mid 1960's and the rollers are really worn to almost nothing. Has anyone had any luck finding replacement rollers that work? Please let me know.
Patty
I was able to repair my old drawers with the following:
1. Remove old nylon wheel from the pin.
2. Grind off the lip on the end of the old dowel pin with a grinder/file and finish with sand paper until the new wheel will slip on.
3. Here are the wheels that you can adapt to fit.
4. Place new wheel backward on drawer dowel pin, put in vise and using a file , file until the small end of the new wheel is flush with the end of the dowel pin.
5. Replace dowel pin wheels on dowel pin correct side out and insert into cabinet face, they won't slide off.
Hi handy person from Elyria, OH,
In #3 above you say, "Here are the wheels you can adapt to fit." I don't see them or anything about them before #4. Would you please clarify?
Thanks,
Quick Learner in Rochester, NY
A homeowner Bowie, MD says: I would like to contact the quick learner from Bowie, MD who said in August 18, 2011:
Didn't find replacement. Hubby did modify the system by cutting off the slide on the drawer, replacing with a new one from hardware store (riveted onto the drawer over the cut-off remains). Cut off the roller from the other piece and attached it to the cabinet. Thank goodness for the top center guide. Not a perfect solution, but it works great - nice and smooth.
I need the same solution, thanks mike
I used 19mm nylon shower door rollers with good ball bearings. I shaved the diameter slightly and beveled them with 'sanding drums' with my drill (a demel might be faster) When correct size to glide smoothly , I used screws that do not have threads near the head (so bearings would turn freely). Then used plastic inserts that fit in the holes (the ones I had that fit I had to trim the length.)
1 user uploaded image
Bought all the stuff at Menards, had to sand the top of the #10 nylon washer to fit slot of roller insert. (#10nylon washer, 1/4 inch nylon bushing, 10-32 lock nut 10-32x1 inch tapered (phillips head screw) 10-32 pressed wood insert.
1 user uploaded image
I made the DIY replacements outlined above by Quick Learner from Peoria il. I made some tweaks I thought I'd share here.
The biggest difference is replacing the pressed wood insert. I didn't like that I couldn't just remove it if needed. I tried the screw-in style, but because the inserts aren't very long, they didn't hold the screw straight enough under load.
Instead I used vinyl plug anchors used for screwing into concrete. Rounded the end using drill and sandpaper to be inserted more easily (used a hammer to get it in an inch or so), cut the excess off, push and twist the Philips driver into the hole to make a better opening and screw into that. I also used 2 or 3 nylon washers instead of the bushing to be able to adjust the length more easily. You can screw in the assembled piece all the way and use needle nose pliers to hold the nut, backing the screw out until the finishing washer spins freely. See my parts list below; all purchased from Menards. Only thing I would change is using 10-32 screws and lock nuts instead of 10-24, for the finer thread.
3 user uploaded images