Coil balance replacement.

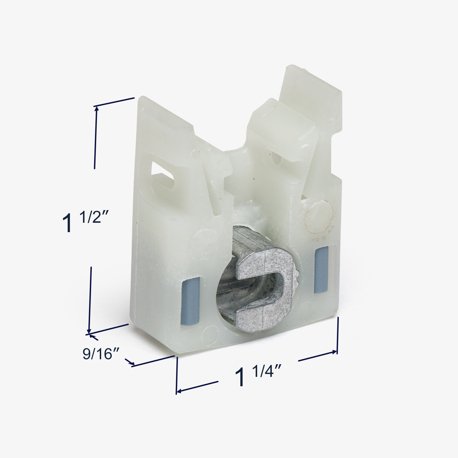
Hello! Looking at your photos, I'm very confident that your pivot shoe is our 15-177. There aren't many shoes out there that have that same diagonal slot. We have dimensions on the 15-177 store page that you can use to confirm.
This product is designed to be compatible with the Series 152 spring. I also recommend reusing your old plastic covers, if at all possible, since I don't think that style is made anymore. At the very least it's not something we can supply.
Lastly, be very careful when making cutouts in your jamb. You don't want the hardware to fall out accidentally during the operation of the window. You really should only need one cutout to remove the whole assembly.
Oh yes, your balance system almost definitely uses two coils. Make sure to get the stamp printed on the coil band when you check; that's how you determine the proper weight option. Otherwise you would have to weigh your sash on a scale and do a little math to figure out what you need.
As for the cutouts, a lot of manufacturers don't bother. They'd rather you buy an all new window than try to repair it, so they don't have a lot of motivation to make things easy for you. Thankfully, making a cutout in a vinyl frame is pretty straightforward so that's not necessary.
Do they both need to connect to coil balance? The other side I can only see one spring in the track.
Great! I'm glad you were able to retain that cover. That'll make your life a lot easier.
Both springs attach to the pivot shoe, yes. In your case it looks like they probably go in the same slot. That's normal, though you can also put one in each slot, if you'd prefer. Whatever is easiest for you.
Based on those stamps it sounds like you have a 5 pound and 6 pound spring. With that in mind, I would recommend the S152-5 and S152-6, respectively.
Note that this combination of weights adds up to 22 pounds of total support (5+6=11, on each side of the sash). You may want to weigh your sash just to be 110% sure that this is accurate; if it's not, you can change the weights accordingly. It's ultimately up to you. I personally like to be extra thorough.
We don't have the kind of photos you're asking for, unfortunately, but it's very straight forward. The coil just slides into that diagonal slot you see at the top of the 15-177 housing. A screw is then inserted from the side to secure it. There's nothing more to it.
I unfortunately can't tell you if your other window is meant to have one or two springs. That's only something you would be able to answer, since you have access to the window. It's entirely possible that that window is only meant to use one spring per side. A safe way to check would be to weigh your sash on a scale and see how much weight that sole remaining spring can support.
I received the springs and shoe but there were springs to attach the springs to the shoe. The old springs were hooked on the end. How do I get or find the screws?
We recommend using a short #8 screw. Something like our 33-072 would work perfectly well, which is 3/8" long, but you can use anything you already have in that size.
I went to install the pivot shoe & It looks to be too big. I measure the channel outside dimensions and its 1 inch 1/8 wide The pivot I purchased is 1 1/4. Looks like is larger than the one already in the channel. So which would fit
I've never known any shoe in this style to ever be made in 1-1/8". We definitely don't have that size, and I'm not sure if it was ever made. I would triple check that dimension, just to be sure. Make sure to remove your old shoe before you measure to ensure that its accurate. Measuring the outside of the channel isn't really going to give you the full story.
I think my next step is get the window vise. I did not want to spend this much but if these are old windows like I think I expect some other issues could be down the road.
Well, it's ultimately up to you. If the only issue is removing the old pivot shoe then I recommend altering or making a cutout (assuming no such cutout exists to begin with) instead of using jamb spreaders. The video below shows you how we do it.