Tilt Latches

A quick learner from Florida says:
Well, I sent the wrong pic. Enclosed is the correct one with additional pics

Color doesn't matter. Black or white. It looks like these were glued?

Thumbnail of the uploaded file named IMG_4656.jpeg
Thumbnail of the uploaded file named IMG_4658.jpeg
Thumbnail of the uploaded file named IMG_4657.jpeg
Thumbnail of the uploaded file named IMG_4659.jpeg
Thumbnail of the uploaded file named IMG_4660.jpeg
Profile picture of Dave Sr.
Dave Sr. from SWISCO responded:

Thanks for reaching out to us. I'm reminded of our 26-088P. I recommend you review the specifications to see if they match what you need. 

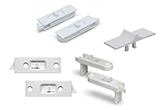
Alternate image for 26-088P

To install the 26-088P tilt latches, you must remove the top rail off the bottom sash. First, you need to remove the top corner screws which hold the sash together. After the screws are removed, carefully take the top rail off the window and glass. Be very careful not to damage the glass in the process. In some cases, you can push back the top rail off the glass. Try wiggling the top rail a little and if you have to, use a hand-held hair dryer on a low setting to soften up the adhesive that seals the glass to the frame. Then the top tilt slides into the top rail from the sides.

Anatomy of a tilt window
VIDEO
WATCH >
Styles of Tilt Window Latches
GUIDE
READ >
Reply to Thread
Use this form to ask a follow-up question or to share your experience regarding this subject.
(your email address will be kept private and is only used to inform you when a response has been made)
Current wait time is 3-4 business days
We promise that one of our experts will personally get back to you as soon as they are able. Thank you very much for your patience and understanding. If your inquiry is time-sensitive, please feel free to reach us at (888) 991-1929 or at help@swisco.com.