If you need to yank on your patio door handle to move it, the rollers are usually the problem. This guide will walk you through the replacement process from start to finish.

Sliding glass doors can be the centerpiece of any room, tying together exterior and interior spaces while providing light, ventilation, and a pleasant view. They require routine maintenance like anything else in your home, of course, but the bottom rollers are especially vital to allowing your patio entryway to work as it should. Keeping these assemblies in good condition will not only ensure that the door opens and closes with ease but will also prevent other parts from becoming damaged, such as the handles and track.
The main thing to remember is that you should be able to open these doors with little more than a gentle touch. If you find that you need to really yank the handle to get the door to move, or if it simply does not slide smoothly, then the rollers are usually the reason why. In most cases, you simply need to clean out any dirt or debris that has gathered over time, but if you have already done that and the door is still not gliding smoothly, then it’s time to replace them entirely.
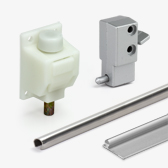
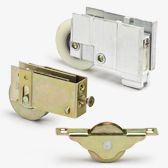
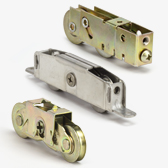
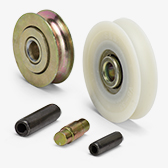
To identify your part, it is necessary to remove an intact roller from the door to compare the style and dimensions to the various single and multi-wheeled replacement options available.
Note that this really is not a one-person job; patio doors can be pretty heavy, and you don’t want to take the chance of trying to wrestle it out of the frame by yourself. It is best to have a friend to help you out. Besides another person to assist you, other tools you will need for this job include a Phillips-head screwdriver, a pry-bar or stiff putty knife, and in some cases a rubber mallet and a small block of wood.
This is my #1 most-asked question regarding patio glass doors. The answer is, unfortunately, yes. I know that going through this process just to identify one small part is a lot to ask, but that’s just how patio doors are designed.
Most manufacturers use generic parts, meaning that the stamps, stickers, or codes that you find on the door won’t confirm what you need. It’s better to remove the door twice and know you have the right roller than to remove it several more times because you have the wrong part.
Don’t take any chances: check your hardware before purchasing replacements.
Step 1
You’ll have to get the screen door out of the way before you can access the glass door. Have a
helper lift one end of the frame while you slide a screwdriver or putty knife underneath to pry the
door out. The goal is to lift the bottom rollers up and free of the track; adjusting them so that
they recede into the frame will make this much easier. Repeat this process for both ends of the
screen door. Most screen doors are relatively light so this step shouldn’t be too much trouble.
Step 2
Once the screen door is out, you’ll move on to the glass panels, starting with the stationary. Start
by checking the threshold next to the stationary door itself and see if a metal plate is installed
there. This long, thin piece runs from the bottom corner of the panel all the way to the side jamb
to brace the stationary door in place. There’s a chance this piece may not have been installed to
begin with, so don’t worry if you can’t find it. If your door does have one, remove it from the
track using a putty knife to leverage it out of the threshold.


Also, check for screws or clips on the top and bottom corners of the stationary panel. These clips hold the panel in place from inside the house.

Once the clips are off, there will be nothing else holding the stationary door in the frame. Remove it with the help of your friend and place it on the floor or on a flat, stable surface until it’s ready to be reinstalled.
Step 3
Removing the sliding panel is a lot like removing the screen door–it’s just a lot heavier. Start by
retracting the roller wheels into the frame by turning the adjustment screws clockwise. The adjustment
screws are located near the bottom of the door, either on the face or at the side corner.


You might see two screws; in most cases, the bottom screw will be the adjustment screw, while the top one is what actually holds the roller in place, but this is not always the case. Give the screw in question a few turns to confirm whether it adjusts the height of the door or not–if it does, you’ve located the adjustment screw.
Retracting the wheels will create more room between the door and the track, giving you the clearance needed to remove it. Have your friend hold one end while you lift the rollers up out of the track. When both rollers are free, you should be able to gently swing the bottom of the panel out of the frame, followed by the top. Once it’s removed, place the panel on a flat, stable surface so that you can easily access the rollers.
Step 4
The correct way to remove a patio door roller depends on the type of door you’re working with. Older
aluminum framed doors require knocking off the bottom part of the panel frame to access the
rollers.
This piece is most likely fastened with the same screws that hold the rollers in place, so remove these
screws from both sides of the panel and then test to see if the bottom piece is removable by hand.
If the frame piece won’t give, you can use your rubber mallet and woodblock to tap along the edge of the frame to loosen it. Make sure to use careful taps to avoid damaging the glass.


On most vinyl doors, the frame is welded together so removing the bottom of the frame won’t be possible. Instead, the rollers can simply be unscrewed and extracted from the bottom of the door.
In either case, make sure to keep your old screws handy so that you can use them for your new hardware.
Once you’ve identified the correct replacement, install the new rollers into the frame by reversing the process described above.
Note that it’s a good idea to replace both rollers at the same time. If you mix and match old and new rollers, you risk extra wear-and-tear on the new hardware since they have to make up for their older, weaker counterparts.
Step 5
When you’re ready to reinstall the sliding panel back into the frame, first insert the top of the door
into the track and carefully swing the bottom into place. As before, adjusting the new rollers so that
they give you clearance will make this a lot easier.
Once you have the sliding panel back in the door frame, you will need to readjust the rollers to whatever position they need to be for optimal performance; the rule of thumb is to keep adjusting the rollers until the door is sliding back and forth evenly and without excess force.
After the sliding door is in place, reinstall the stationary door and push it all the way back into its original position, fastening it back to the frame with the original screws or retaining clips.
Lastly, reinstall the screen door using a putty knife or screwdriver to help raise the wheels if necessary.
See our team complete this process in the video below. If you need help identifying or replacing your rollers, ask our experts!
To recap, follow the steps below with the help of a friend to access, identify, and replace your patio door rollers.