Help with coil balances

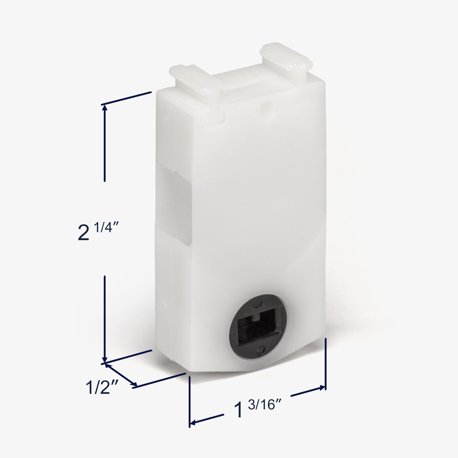
Hello! Thanks for reaching out to us. Looking at your photo, it looks like you have our 15-087 pivot carrier. This is designed to be compatible with our Series 180 coil spring.
Your next step is to look over these parts to verify that their design and size matches your old hardware. You'll also need to remove the old spring to get its weight stamp. Note that I bring up the 15-087 pivot carrier only as a point of reference; assuming your old carrier is still in good condition, you can reuse that and just replace the spring by itself.
Great! If your parts differ in any way from the products I've recommended, feel free to upload your data here for me to review.
https://www.swisco.com/discussions/Coil-balance-PAT-5353548-77-186476
Tom
That definitely looks like our 15-087 to me. As long as the dimensions match up then our Series 180 should work perfectly fine for this application.
If there is no stamp printed on the old spring, then you will need to weigh your sash on a scale and divide that by the number of springs that support it; in your case, that'd be two.
So, for example, if your sash was 10 pounds, you'd need two 5 pound springs. If it was 8 pounds, you'd need two 4 pound springs. And so on.
Do I need Tandem Coil Housing (Product Code: 15-086)?
Thanks! Tom
Yes, that's correct. For a 14 pound sash, using one 7 pound spring per side will be perfectly sufficient.
These parts don't come pre-assembled, so you will have to put them together as you install. There's also no need for the 15-086 tandem housing since you're only using one spring per side. You'd only want that if you had two springs per side.
Awesome, thank you! We really appreciate the business, it means a lot.
There's no need to put my name anywhere, but that's kind of you to offer. Just be sure to reach out again if you had any other hardware questions in the future.
To assemble this balance assembly, the spring and drum go inside one half of the 15-087 housing, then the two halves of that housing just snap together. Make sure that the spring is facing up before you snap it together, so that it can extend up to hook onto the mounting bracket.
