Louver window mechanism stripped

Home Owner from Catonsville, Maryland
The crank style operator on one of our windows appears to be stripped. I can turn it but the window does not open or close - seems the internal threads are not engaging properly. I have included photos of the parts with a ruler alongside for dimensions. I'm hoping you can identify the correct replacement parts so we can control this window in my wife's studio.
5 user uploaded images
10 Replies
Casey
Casey from SWISCO
SWISCO
Expert

Hello,

We'd be happy to help but we'll need more information to narrow down your options. To get started, we'll need to see a clear view of the top and bottom installation holes. We'll also need to see the operator fully removed from the window so that the opening in the end of the link arm is fully visible. Thank you! 

Home Owner from Catonsville, Maryland
Thanks for your attention - I will get back to you with additional photos in mid-April when I have access to the studio again.  
Casey
Casey from SWISCO
SWISCO
Expert

No problem. We'll be here whenever you're able to get the additional photos. Just let us know if you have any other questions in the meantime. 

Home Owner from Catonsville, Maryland
Ok - we're back. Here are shots of the installation holes (1 top, 2 bottom) and of the operator removed and link arm. Do these give you enough detail or can I provide another angle for you?
3 user uploaded images
Casey
Casey from SWISCO
SWISCO
Expert

We can't be sure of what you need with the link arm still attached to the internal linkage. With that being said, we've listed a few similar options on this page to start with. Take a look and compare the installation hole spacing and size of the hole at the end of the link arms shown on our product pages to your assembly to determine if one of them match your assembly. 

Home Owner from Catonsville, Maryland
I've run into a snag - the screw that connects the link arm is rusted in place. I have tried soaking it in WD-40, tapping it with a hammer and cursing. Nothing has loosened it yet. Any other suggestions? I feel like we're so close to fixing this but I'm stymied at the moment.
Dave Sr.
Dave Sr. from SWISCO
SWISCO
Expert

Comparing the specifications of the 39-025 crank shown below to your assembly would be a good place to start. As for removing that screw, keep soaking it with WD-40. Sometimes it takes a while for it to work. You can also try using some heat on the screw. Lastly, take a hack saw blade and try to cut the screw off. This can be a problem with rusted screws.
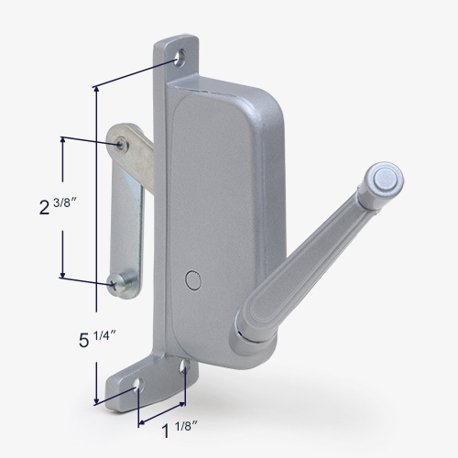
Dimensions for 39-025

Home Owner from Catonsville, Maryland
Hallelujah! The hacksaw blade did the trick after many attempts with WD40, heat gun and hammering. The measurements of mine appear to match the 30-025 exactly and it looks like it comes with a new screw to replace the departed one. I'm placing an order for it today. Thanks for all your help
Dave Sr.
Dave Sr. from SWISCO
SWISCO
Expert

We also carry the 33-206 nylon bushing if you need to replace that part as well. Take a look and let us know if you need anything else. 

Reply to Thread
Current Photos:
Related Products
Related Videos
Related Guides