Pella Spring balancer

Hello there. This pivot shoe might be an older version of the 15-228. See the illustration below and ensure that the width and thickness match your old pivot shoe. If it differs, let me know by how much.
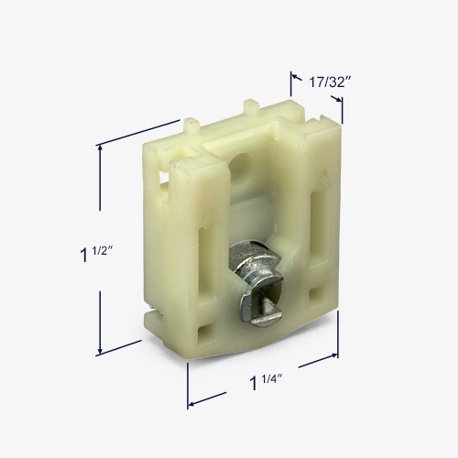
If the dimensions match, then you should be able to use the 15-228. This shoe usually uses 1/2" thick Series 160 Coil Balances. Measure the thickness of your old coil tape to ensure that it is 1/2" thick. If the tape is less than this, such as 3/8" thick, let me know. Finally, you'll need to choose a spring weight for the new coil springs. This indicates how much weight each spring can individually support. There should be a stamp somewhere on the old tape that indicates this, but if there is none or you're unsure, just give me the exact weight of the window sash, and I can work out what you need.
Bob - Thanks for such a quick reply which I missed until now. Yes you are correct with the size of the pivot shoe that you show above and the tape is 1/2 inch thick. Tape says 7.5 lbs and 35" I believe.
Do I just order 2 of each or do I also order the top part as well?
Also are these easy to get back into the window?
Thanks for all your help.
So, if I were you, I would replace every individual coil spring used on this window, even the ones that aren't broken. The reason you want to do that is because springs lose their tension over the years, little by little. That means when you mix old springs with newer versions, the new ones have to work extra hard to pick up the slack for their weaker partners. That extra strain leads to early failure. Replacing all springs for the same window at the same time avoids that and ensures that the balance assembly will remain operation for many, many years.
Other than the springs, the rest of the components can continue to be reused as long as they aren't damaged. That includes the pivot shoe and the plastic cover. If those are in good condition then you can keep on using them with no problem.
As for how easy they are to get back in the window, I won't lie to you: it can be frustrating. Most of these components are made of hard plastic or metal, and they're all only loosely connected. Getting them to snap into that cutout (which is smaller than the assembly itself) takes a bit of patience. I like to use a screwdriver to kind of wedge the jam open a little wider with one hand while I pop the assembly in with the other. Just make sure not to be too rough, since you don't want to crack the vinyl lining.
The video below will show you a visual example of how it's done. Hopefully this helps. The best advice I can give you is to try to be patient and do your best to feed the balance assembly into the cutout from one end, rather than trying to pop it all in at once. The video also shows you how to widen the cutout, which is definitely a good option, but just make sure not to make it too big. You don't want the balance to fall out during normal operation.