Repairing and Replacing Jalousie Window Rivets

Quick Learner from Portland, OR
Apr 7, 2016 12:04 am

My in-laws have Jalousie windows throughout their house. One of the "rivets" holding one of the louvers in place has lost its head and I'm trying to figure out (from a thousand miles away) how to repair it when I visit them. They are pretty elderly and getting detailed information from them will be interesting so I'm trying to cover all my bases in advance.

What are my best options for repairing this and what sorts of tools and parts will I need? And what information do I need to attempt to get them to take before I get there?

Picture of the damage attached.

Thanks in advance.
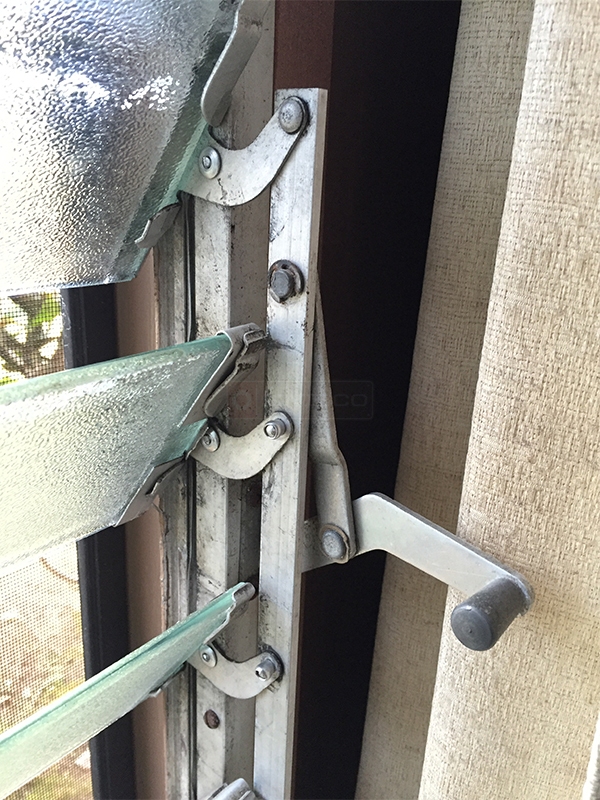
User submitted a photo of jalousie window hardware.
7 Replies
Dave Sr.
Dave Sr. from SWISCO
Apr 11, 2016 10:25 am
SWISCO
EXPERT

I've come across this same problem. What I have done myself was to drill out the old rivet and use a 3/16" diameter pop rivet to replace the old one. Make sure not to squeeze too hard when installing, or you will make the rivet too tight. It could make the operation of the window difficult.

Quick Learner from Portand, OR
Apr 15, 2016 12:38 am
Dave - Thanks for the help. Without your guidance this would have been an impossible task given the resource constraints. What started out as 3 replacements turned into more than a dozen. Fortunately, it went smoothly and quickly.

Thanks again. A picture of the results:
User submitted a photo of jalousie window hardware.
Dave Sr.
Dave Sr. from SWISCO
Apr 15, 2016 2:35 pm
SWISCO
EXPERT
That's great! Thank you so much for the update. I'm glad we were able to help. Let us know if you ever need anything else.
Handy Person from San Fernando Valley, California
Sep 16, 2018 5:43 pm
Thanks SO much for this thread! I was researching a part for my neighbor's jalousie, and when I found this thread, I had an AHA! moment to repair my own. The brackets for the bottom pane had two broken rivets, so it dragged.

Well, I just fixed it, thanks to you all!

The tips I'll add are:

When I started to drill out the first rivet, the drill bit kept skating off. After scratching the rivet too many times, I decided to file it down to an even surface. That worked, and when I tried to dimple the end again, the rivet just pushed into the cavity, no need to even drill. (I must have filed off more than I realized, LOL.)

For the other end, I dimpled it with an awl, then used a small drill bit (1/16"?) to drill a pilot hole. That solved the skating, and I drilled out the rivet with a 3/16" bit.

I was so excited, I even cleaned the glass!

Thanks again.

PS - here's a photo. The new rivet is the shiny one at the bottom.

You don't happen to have any bright ideas for cleaning all the metal? Maybe something foaming?

Louvre - replaced rivet-h400
1 user uploaded images
Dave Sr.
Dave Sr. from SWISCO
Sep 25, 2018 8:18 am
SWISCO
EXPERT

There is a product I like called CLR that cleans Calcium, Lime and Rust (hence the name!). However, Try contacting a hardware store in your area to see what they suggest. Ask them if that could work or if they have another little trick they like to use.

Tom
Tom from SWISCO
Sep 25, 2018 8:19 am
SWISCO
EXPERT

Speaking for myself, I like PB B'laster (which is ideal) or WD40 (a good plan B), both of which are anticorrosive. You'll want to treat the metal according to the directions on the bottle.

Home Owner from Texas
Oct 24, 2022 5:35 pm
A trick I used was to use a open ended piece of thin metal flashing that I could use as a spacer when I snap the pop rivet. Then pull it out and it will leave a nice working easy to use gap.
Products and resources found in this discussion
Reply to Thread
Use this form to ask a follow-up question or to share your experience regarding this subject.
Current wait time is 3-4 business days
We promise that one of our experts will personally get back to you as soon as they are able. Thank you very much for your patience and understanding. If your inquiry is time-sensitive, please feel free to reach us at (888) 991-1929 or at help@swisco.com.
Need help identifying your part?
Send a photo or description to our Parts Experts!
Identify Your Part
SWISCO Part Experts