How to install the 40-128 storm door closer
This installation guide explains how to install the SWISCO 40-128 Deluxe Heavy
Duty Door Closer.
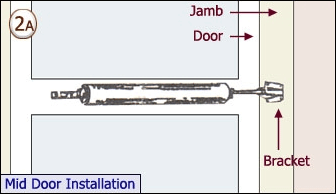
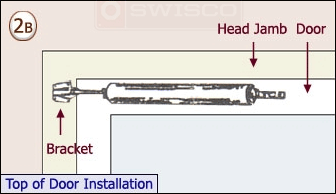

Choose the mounting location of the storm door closer. See figure 2A for mid door installation, or see figure 2B for top of storm door installation.
Jamb Bracket Installation
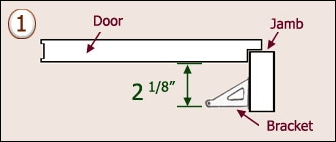
Step 1
Position the bracket on the jamb and indicated on figure 1. The straight side of the bracket should be 2 1/8" away from the inside of the door frame face. The
arrow on the jamb bracket must point towards the storm door. MAKE SURE THE STORM DOOR CLOSER WILL BE
LEVEL.
*For top of the storm door installation: leave 1" from the head jamb of the door frame to the jamb bracket.
*For top of the storm door installation: leave 1" from the head jamb of the door frame to the jamb bracket.
Step 2
Mark the screw locations.
Step 3
Fasten the jamb bracket with four 1 1/4" screws (included).
Storm Door Closer Instructions
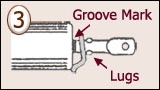
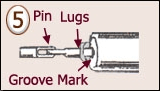
Step 1
Slip the hold open washer over the closer rod. Extend the rod
from
the closer and position the hold open washer behind the lugs (Fig. 4).
The groove mark should be visual 1/8" from the end of
the cylinder (Fig. 4).
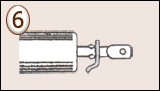
Step 2
With door completely closed, slip the end of the rod into the
jamb
bracket and insert the pin. With the closer in a level position, hold door bracket (at end of door closer)
against storm door and mark screw holes. do not adjust the hold open washer from step 1. This will give
proper tension for setting of the door closer (Fig. 6).
Step 3
Use a center punch to mark the drilling locations. DRILL THE
INNER
PANEL ONLY. Drill holes with a 1/8" drill bit. Fasten
with two 3/4" screws (included).
Step 4
After installation is completed, move hold open washer behind the
lugs on the rod (Fig. 7). If the rod does not return,
it may be necessary to adjust regulating screws (Fig. 5).
Related Products

