How to install the 40-036 storm door chain
This installation guide explains how to install the SWISCO 40-036 replacement storm door
chain.

Step 1
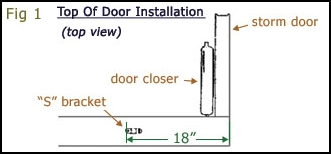
Make a mark 18" from the
hinge side of the door on the head jamb of the door and on the storm door. See Fig 1.
Step 2
Using the "S" bracket (or a standard bracket) as a template, mark
the screw locations on the head jamb as shown in Fig 1. Install the "S"
bracket parallel to the storm door with the single hole of the bracket pointing towards the hinge side of the
storm door. If the door closer is mounted on the top of the door, connect the chain to the storm door by
inserting the end of the chain into the chain pin bracket at the end of the door closer and dropping the pin
into the link of the chain so that the storm door is limited to a 90 degree opening. Proceed to step
9.
*If the door closer is not mounted at the top of the door, the chain bracket must be installed at the top of the storm door. See Fig 2
*If the door closer is not mounted at the top of the door, the chain bracket must be installed at the top of the storm door. See Fig 2
Step 3
Make a mark on the door 18"
from the hinge side of the door.
Step 4
Using the chain pin bracket as a template, mark the screw
location on the door.
Step 5
Drill the inside skin of the door. CAUTION:
DO NOT DRILL THROUGH THE STORM DOOR.
Step 6
Attach the door bracket of the storm door.
Step 7
Attach the chain to the storm door by inserting the pin provided
into the chain pin mounted at the top of the door. Make sure the the chain limits the door to a 90 degree
opening. See Fig 2
Step 8
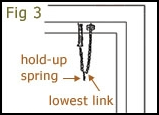
Close the storm door and twist the spring into the lowest hanging
chain link. See Fig 3
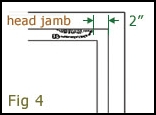
Step 9
Fasten the free end of the spring to the head jamb, approximately
4" from the door face and 2" down from
the side jamb, with the nail. See Fig 4
Related Products
