How to install a wood casement window crank
This installation guide explains how to install the SWISCO right handed crank
operator 39-020 (see 39-021 for the
opposite side). The SWISCO crank operators 39-020 and 39-021 are designed to accommodate standard screened
casement windows 14" to 20" wide employing butt hinges.
Note: 1" minimum clearance between sash and screen is required for arm and channel; 4" is the maximum.
Note: 1" minimum clearance between sash and screen is required for arm and channel; 4" is the maximum.
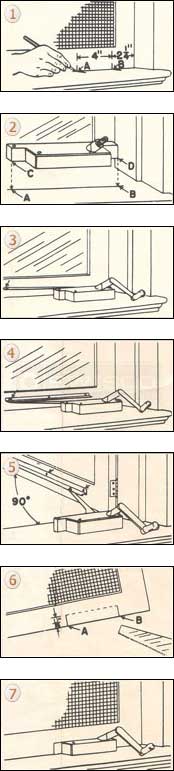
- With the window screen panel in position, mark window sill and screen rail at points A and B. Point B is 2-1/4" from with window jamb. Draw a line across the window sill through and beyond points A and B. Remove the screen panel.
- Place the window crank operator on this line so that the corners C and D rest on points A and B. Secure the window operator with three screws.
- Secure the window crank handle on the operator and turn until the window crank operator's arm touches the closed window.
- Slide metal channel guide over the window crank operator's arm button to a point about 1" left of the button. Insert a screw in the first on the left, but do not tighten.
- With the button in channel, turn the window crank operator's handle until window is open 90 degrees. Insert a screw in the opposite end of the channel and in the center hole. Tighten all screws.
- Notch the window screen rail between the points marked in Step 1 (points A and B) to a height of 11/16". This notch-out permits screen to fit snugly over operator.
- Replace the window screen panel.
All directions on this guide apply only to the right-hand operator. For installation of the left-hand
operator, use left jamb of the window sill as base of measurement.
Related Products
