Top Sash Guide for Kinco Window

Home Owner from Tampa, FL
Am unable to find the part number but it resembles the following two and am not sure which one to purchase.

18-166 Top Sash Guide, Kinco
18-044 Top Sash Guide, Kinco

This is a Non Tilt 1/2" Channel Balance window was made by Kinco and its a M/I home built in 2004.
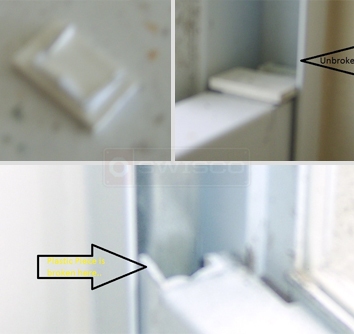
I don't see an option to upload images. I have couple of pics and that may help you.

Appreciate your help.

There is a sticker with the following information:

QUALITY CONTROL & TESTING AAMA CERTIFCATION PROGRAM ACCREDITED BY AMERICAN NATIONAL STANDARDS INSITUTE A-L-I ® VALIDATOR MFR. CODE: KINCO, LTD -JAX, FL

SERIES: MARK 40/50 STD FIN AAMA / NWWDA 101/I.S. 2-97 H-L C25/35 - 52*96
User uploaded image of sash guide.
4 Replies
Casey
Casey from SWISCO
SWISCO
Expert
Thanks for sending images, I cannot see the hole placement or measurements to identify the proper replacement top sash guide. Take a look at SWISCO product code 18-166 Kinco Top Sash Guide to see how to measure the installation hole placement, also measure the width below the cap (5/8" on the 18-166).
Quick Learner from Charleston SC
How do you replace these types of glides? The 18-166 Kinco top sash glide looks like what I need. Would like to just replace every glide in my house...

Any information on how to do this would be helpful.
Casey
Casey from SWISCO
SWISCO
Expert

How to replace the 18-166, Kinco Top Sash Guide

First remove the window sash.

Windows that use this type of top sash guide have channel balances. Take a look at the following guide:

To remove the window sash pop up the Take Out Clips, as shown in the guide. Next, raise the sash up past the base of the channel balances. Now you should be able to push the sash into one of the sides of the window frame and pivot it out.

With the sash removed we can get to work on replacing the top sash guides. Hold the frame firmly together when unscrewing and replacing the top sash guide, the same screw holding the top sash guide in place is often the same screw holding the window corner together.

Replace the window sash above the base of the channel balances and push the sash down to engage the balances, push the Take Out Clips back into place.

Job complete.

Reply to Thread
Current Photos:
Related Products
Related Videos